While we’d all love to buy everything domestically in Canada, sometimes you don’t have a choice. There’s always excitement when purchasing goods online but then the dread sets in of whether you’ll be dinged duties. Worse yet, if you’ve ever dealt with international shipments with UPS, you know about their ridiculous customs fees.
The good news is that there’s a way to avoid paying UPS brokerage fees in Canada. In this article we’re going to give a full rundown of what the fees actually are and a process called self clearance to get yourself out of paying those import fees.
Stop Paying UPS Brokerage Fees

We’ve gone through this in detail with DHL where they call it customs fees where we explained how to self-clear your own packages but having recently been slapped with a massive bill from UPS, we thought it’d be a great idea to answer those UPS-specific questions you might have.
The truth is, UPS is the worst when it comes to customs fees – not because the taxes and duty are different but because they charge something called “Brokerage Fee”.
So whether you’ve ordered that awesome gift for a travel lover, or an epic-sized world map with pins, or literally anything else you’re buying online that comes from outside of Canada, we’re going to explain what the heck is going on, how to give you step-by-step instructions for how to avoid it, and cover a few scenarios that you might be encountering.
What Are These Import Fees?
When you buy something internationally from say the United States, United Kingdom, or Hong Kong or a friend or family member ships you something, they have to declare what the item is and its value.
Like how we pay taxes on practically everything here in Canada, there are taxes on goods that you’re importing through a courier like UPS. For shipments, there’s more to it and it all sums up into what’s called “Import Fees”.
You’re essentially importing goods for personal use by courier.
Here’s a breakdown of the common line items included in import fees and what they mean.
HST or GST + PST
This will depend on what province you’re in but it’s the baseline tax on goods that you’re used to paying at home.
Can you avoid this: If you’ve been charge this, no.
Duty
Duty is a new variable that you’re probably not used to seeing. I’ll be honest, it’s a bit complicated but it has to do with you importing goods into the country. Similar to how big companies have to pay extra duty when importing products to sell here, there’s as similar charge at a small scale for individuals.
Figuring out the rates for duty is a bit more complicated but it very much has to do with the category of item that you’re importing and where it was manufactured. This requires a good understanding of HS Codes and Trade Agreements.
Thankfully, there’s a Canada Tariff Finder where you can find out whether there is duty on a specific type of item. It’s not perfect but should give you an idea of what to expect if you’re trying to figure out whether it’s worth it to buy something or not.
As a generalization, if your item is from the US, the Free Trade Agreement (now called CUSMA) should apply and you won’t be charged duty.
Can you avoid this: If you’ve been charge this, no.
PRO TIP: Check out CBSA’s basic calculator to give you an idea of the taxes and duties. You might have some trouble finding an exact category for the item you’re shipping but try to find the closest one.
Brokerage Fee

Then there’s the infamous UPS brokerage fee. This is the name that they use and is synonymous with customs processing fee, broker fee, and clearance entry fee that other couriers will use.
Essentially, when a package is flagged for taxes and duty, UPS offers a convenience service to pay it for you so it’s a seamless delivery process straight to your door.
In theory, this is great and for some the convenience factor is worth it but for some of us, it’s shocking that service charge is as much as it is.
What’s appalling is that out of all the primary couriers out there, UPS is the most expensive. It’s honestly highway robbery.
Here’s the current customs clearance rates (UPS calls these “entry preparation fees”) on shipments into Canada from international origins. All of these are in CAD and there’s taxes on top of this fee.
- [£40.01 – £60] – £18.45
- [£60.01 – £100] – £22.00
- [£100.01 – £150] – £29.357
- [£150.01 – £200] – £33.55
- [£200.01 – £350] – £63.15
- [£350.01 to £500] – £70.30
- [500.01 to £750] – £83.75
- etc. etc.
Visit the UPS rate guide (go to Page 115) for the full chart.
Can you avoid this: Yes, keep reading.
Disbursement Fees
To add insult to injury, there’s something called a disbursement fee.
When UPS remits payment of duty/tax to the Canadian Border Services Agency (CBSA), on behalf of the customer, UPS invoices the customer. They charge a *insert expletive* fee for the invoice.
This is the greater of 3.7% of the duty/tax amount or £7 on UPS Standard Service or £11 on UPS Worldwide services.
Sneakily, UPS bundles the disbursement fee with the brokerage fee.
Can you avoid this: Yes, keep reading.
Import Collection on Delivery Fee
Fees on fees on fees.
UPS then has the audacity to then add something called an Import Collection on Delivery (ICOD) fee which is “assessed when collecting import charges on delivery”.
This is when somebody knocks at your door and gives you a package and tells you that you have to pay the fees in person. This is the fee they charge on top just to twist the knife after the initial stab.
NOTE: In the e-mail you receive, it says the ICOD fee is £6 according to the official rate guide.
Can you avoid this: Yes, if you pay UPS online, they remove this fee but keep reading to find out how to avoid paying ICOD, brokerage fee, and disbursement fee completely.
How To Avoid UPS Brokerage Fees
This is why you’ve come here and so there are 3 basic ways to avoid these import fees.
1) Don’t Use UPS
We’re not trying to be snarky but seriously UPS is the worst. Avoid them at all costs unless you can buy from a vendor that is using a version of UPS where duties, taxes, and fees are all pre-paid.
Companies like B&H for camera and gear offer this which makes it so much easier.
If you’re not using UPS, who should you use? We recommend USPS, Royal Mail, or any other local post office. They don’t charge any type of customs or brokerage fees. Instead, they charge taxes and duties. Normally, I’ve found them to be much more lenient when it crosses the border and is given to Canada Post to deliver. I feel like you can get away with much more with them.
2) Declare The Shipment As Under £20 CAD
The Canadian rule is that if the shipment is £20 CAD or less, it’s not subject to taxes and duties.
In some cases, you can ask a vendor to declare the item for less value than its worth.
There are of course insurance implications here so if an item is declared as less value, if it goes missing or is damaged, the coverage (if purchased or built-in to the courier) will be according to the declared value. This is why most companies won’t do this.
If it’s friends or family, this shouldn’t be an issue.
NOTE: Remember that Canada cares about the Canadian dollar value and not the foreign currency.
3) Declare The Shipment As A Gift And Under £60 CAD
The other exception are gifts. Any gifts that are £60 CAD or less are also exempt from taxes and duties.
Again, either convince the vendor to declare it this way or get your friend/family to write the import slip that’s stuck on the package accordingly.
For more details, make sure to check out CBSA’s Determining duty and taxes owed clarification.
BONUS: There are also rules around samples and warranty returns but as an individual, that’s a bit harder to pull off and we don’t know what the tax-exempt value is.
4) Ship The Item To An Amerifriend
This is a bit tongue-and-cheek but I’m serious, it’s crazy how relaxed customs and duty policies are in the US. As a result, for some shipments where I don’t want to deal with self-clearance and am willing to wait, I will often ship to my American friends and pick them up myself at a later date.
Another option is to ship to a holding area near the border. In the past I used in Buffalo are American Mail Box and
Another option is to ship to a holding area near the border. In the past I used in Buffalo are American Mail Box and NYAddress.
PRO TIP: You can also ship directly to the UPS Customer Center. If you live in ONtario, the Niagara Falls location is 4 miles from the Lewiston-Queenston Bridge.
Your Name- Hold for Pickup
UPS Customer Center
6601 Packard Rd
Niagara Falls, NY 14304
Step-By-Step Instructions For Self Clearance Of UPS packages

Most pages we’ve seen that cover the topic of how to avoid extra fees for international delivery services just list out the instructions at a high level with no explanation.
In our guide, we’ll go through each step for Canadians in detail.
Summary of Self-Declaring Packages with UPS
This is a little TLDR as some have asked. Thank you to Jeremy for this idea!
- Wait for your package to arrive in Canada
- You must wait until the package has physically arrived in Canada before you can self-declare.
- You will usually receive a UPS tracking number from where you purchase the item from.
- Once the package has crossed the border according to the tracking, reach out to UPS.
- Contact UPS proactively
- Immediately call UPS to initiate self-clearance (call or e-mail).
- Request a UPS Self Clearance Reference Page or Casual LVS Self-Clearance Reference Page.
- If the package gets delivered, refuse the package
- DO NOT ACCEPT DELIVERY.
- Tell the driver you refuse the package so that it is held at a local depot or post office for pickup.
- Gather the required documents and head to CBSA
- Head to your closest CBSA Inland Office.
- Gather your item’s receipt, waybill (if available), and government-issued ID.
- Pay the taxes and get B15 Form
- The LVS form isn’t stamped by CBSA anymore.
- Send the documentation to UPS
- Take a photo of the LVS form and B15
- Item is released and delivered
That’s it! Super easy. That said, there more details that are good to understand before you proceed so we also have the detailed instructions below.
Step 1: Import Charges Are Accessed
After the package is picked up from the country of origin, it’ll make its way into Canada and cross a port of entry. It’s in this processing facility that your package will clear customs and ultimately accessed taxes and duties.
There’s a few likely ways you get notified:
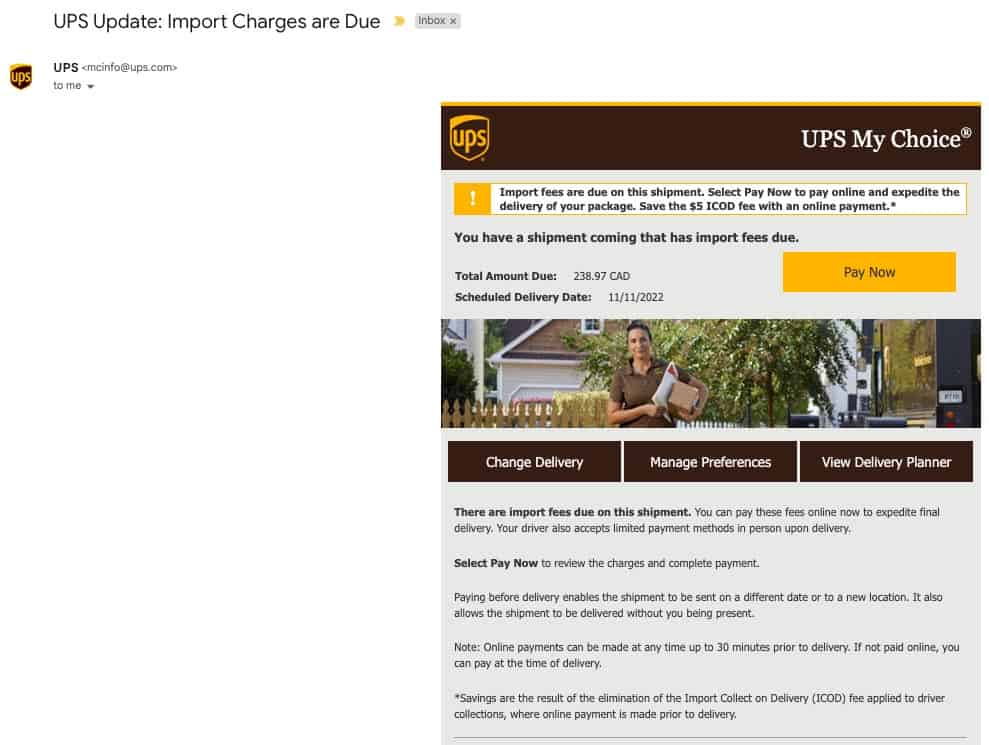
- Your e-mail is attached to the shipment – You will receive an e-mail with the subject “UPS Update: Import Charges are Due”.
- If you already have a UPS My Choice account – You get notified of any packages delivered to a specific address and as a result, you’ll get an e-mail with the subject “UPS Update: Import Charges are Due”.
- By phone – It’s mandatory for the shipper to at a minimum to put the receiver’s phone number so if they don’t have an e-mail on file, they’ll be calling to let you know. At that point, in theory you could let them know that you’d like to self-clear the package.
- You’ve been following the tracking number – There’s always the UPS tracking page which will display that there’s an import fee.
Important: Whatever you do, do not pay the import fees online. Once you pay, you’ve essentially accepted the UPS brokerage fees and there’s no turning back.
You might get a call about import charges instead
Something we’ve noticed happen recently is that UPS will try to pre-emptively call you about upcoming import charges on a package and get you to decide on the spot whether you want UPS to clear it for you or to use your own broker. Self-clearance is never provided as an option.
The call can come from the port of entry but can also be one of the routing offices. For Fort Erie, they seem to be managed by Fredericton, New Brunswick.
When this happens, simply say “I’d like to self clear this package”.
If you miss the call (or think it’s another spam call), they will leave a voicemail telling you to e-mail [email protected]. Make sure to put the tracking number in the subject and in the body of the e-mail and immediately tell them you’d like to self clear the package.
At this point they should be able to code the package in their system as “clears own”. You can skip Step 2 and go straight to Step 3. On the tracking page, it should also be reflected as a line item that says “Pending Release from Non-UPS Broker”.
Step 2: Call UPS To Initiate Self-Clearance

Once you either receive the e-mail or you see in the UPS tracking website with the line “Import charges are due for this package. Select Pay Now (where available) or pay at delivery.”, immediately call UPS.
Go to the UPS Contact Us page, scroll to the bottom and you’ll see the customer service 1-800 number.
Call this number and explain that you’d like to self-clear this package. Have the tracking number in-hand.
The good thing is that the customer service representatives are well-versed in how this process works and will make the necessary changes in the system. There are no pressure tactics or anything. This might be a change from before where they’ve tried to play coy with this.
Don’t bother with e-mailing UPS. Calling is the fastest and most direct way.
Another name UPS uses for self-clearance or self-clearing is “clears own”.
GOOD TO KNOW: According to UPS, you can still initiate self-clearance as late as the driver making their first failed attempted delivery. We were surprised to hear this when we asked UPS this question.
ALTERNATIVE: You can also e-mail [email protected]. Put your tracking number in the subject and body of the e-mail and tell them that you’d like to self clear the package. We’ve found that they are not the quickest to reply to e-mails but they should eventually get back to you.
Step 3: Await UPS Documentation Via E-mail

Even though the UPS customer service agent has set the package to be reconsigned to you for self clearance, the document you need doesn’t come into your inbox right away.
In our case, it took 36 hours for the e-mail with subject line “Shipment (insert tracking number)” to arrive. This is a highly manual process and comes straight from the office admin at the port of entry. In our case, this came from Windsor. The admin that responded worked the night shift (11PM – 5AM) and received a response at 12:56AM.

In a separate scenario, a package from B&H came through Fort Erie and someone from that office who only works Monday to Friday 6:30AM – 2:30PM e-mailed us at 8AM the next day.
The document is two pages and comes in the form of a PDF. Having done this a few times, these documents don’t seem to be consistent but are effectively:
- A UPS document called an LVS (low value shipment)
- Invoice from the sender which can either be directly from the seller or a generic invoice generated by UPS, primarily containing the contents of the package and value.
What’s becoming clearer is that every port of entry’s office does things a little differently. In the two examples shared above, Fort Erie has a much more thorough document than what Windsor provides.
The LVS Conspiracy
Not that UPS has acknowledged this but according to CBSA, the Courier Low Value Shipment Program was placed on a moratorium starting June 3, 2019.
In theory, the LVS shouldn’t be required but in the real-world, that’s not the case. If you want to push back, you can reference the CBSA importing casual goods by courier page and this PDF.
This means that UPS should not require an LVS to release an item. This explains why CBSA no longer stamps LVS documents anymore.
Couldn’t you bypass UPS completely?: If you’re feeling ballsy, we’ve heard from our readers that you could take a gamble and bring the item’s order invoice and a screenshot of the UPS fees and the CBSA officer can help sort out the rest. I haven’t tested this personally but thank you for sharing Kari. It’s worth trying if UPS is giving you the run around.
What if they never email or call you back?: In case of purposeful or accidental stall tactics, one reader, Steve simply jumped to Step 4 with the invoice from the vendor and a printed screenshot of the UPS tracking and their invoice. He was able to get Casual Goods Accounting Document (Step 5) and submitted this back to UPS (Step 6). Another reader, Scott, left a case study of his experience in the comments where he also went straight to CBSA where they could pull the commercial invoices from the system simply by looking up the tracking number (as long as they’ve been cleared at the Canadian port).
Step 4: Look For Your Closest CBSA Inland Office

One of the biggest tricks of this whole process is knowing where to go in Canada to pay the tax and duty yourself as part of self clearance of packages.
The CBSA has many different types of offices around the country but the one that can do the type of processing you’re looking for is called an Inland Office.
I won’t list out all of them but here are a few offices that we’ve located:
- Vancouver – Vancouver Commercial Operations West (809) at 1611 Main Street, 412-1st Floor, Vancouver.
- Calgary – Calgary Air Commercial (701) at 175 Aero Way North East Unit 162, Calgary
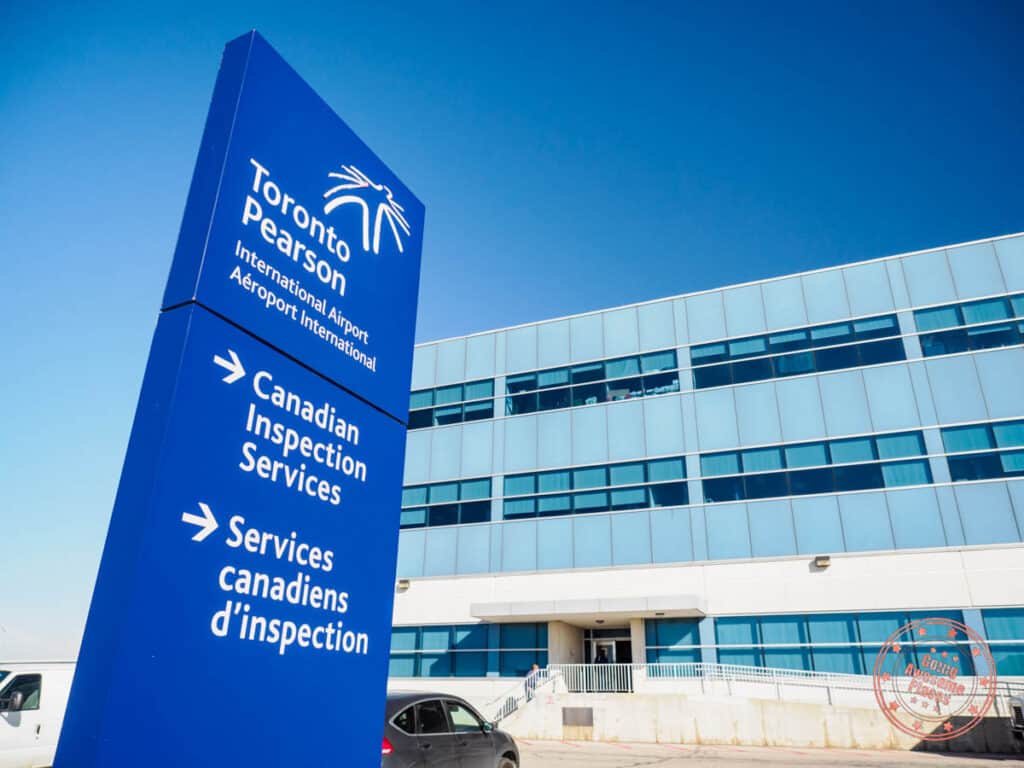
- Toronto – Toronto Lester B. Pearson International Airport Commercial Operations (4,973) at 2720 Britannia Road East, Mississauga. On the map, it looks like it’s literally in the airport but in reality it’s outside of the airport and can be driven to.
- Montreal – Montreal (395) at 400 Place d’Youville, Montreal.
- Quebec City – Quebec (312) at 130 Dalhousie Street, Quebec.
- Halifax – Halifax Commercial (9) at 263 Susie Lake Crescent.
- Prince George – Prince George Airport (820) at 4 – 4141 Airport Road.
To talk to someone directly at CBSA, call 1-800-461-9999.
PRO TIP: From one of our readers in Prince George, they visited the Inland Office by the airport but it turns out that they don’t handle anything like this. This means that there’s a chance that smaller offices may not have the capability or CBSA officers on-staff to help with this.
Step 5: Visit CBSA Inland Office To Pay Tax And Duties
Before you leave the house and plan your trip to the CBSA Inland Office, make sure you have a print out of the documents UPS provided in Step 3. Also make sure you have a piece of ID. Your driver’s license will suffice.
Each Inland Office will be set up differently so we can only speak from experience with the Toronto location.
The Toronto office is adjacent to the airport and is located on the first floor of a large office building. You’ll likely see many courier trucks in the vicinity. Once you walk in, the Inland Office is to the right.
Speak to CBSA Officer

When you enter, you’ll first head to the left and line up to speak to one of the CBSA officers. These officers are luckily in a much better mood than the ones at the airport although YMMV.
You’ll hand over your UPS document and ID.
The officer will enter the information into the system and print out paperwork that you’ll need for the cashier. In some cases, they’ll ask you to sit down and they’ll call you up when the paperwork is ready.
This is a quick process and shouldn’t take more than 10-15 minutes.
PRO TIP: If your officer says that you can’t clear it because your package came through a port of entry in a different province, ask to speak to a supervisor to get more clarity on the rules. It may be possible that the one you have doesn’t know the details of the rules.
Pay cashier

The cashier is at the back of the Inland Office where you’ll queue again. The CBS officer will directly pass the paperwork to the cashier.
At the cashier, you’ll pay the taxes and/or duties owed. You can pay by cash, debit, or credit card (American Express accepted). They said that they prefer not to handle cash at the moment.
The output of this step is a “Casual Good Accounting Document” (also called a B15) stamped by the cashier that says “Duty Paid”. You’ll also get the UPS documentation (also called LVS) you provided back.
IMPORTANT NOTE: Not long ago, they used to stamp the LVS but I was told in August 2023 that CBSA no longer does this anymore.
What of UPS refuses self-clearance without a stamp? I would be quite forceful on this issue that CBSA no longer stamps the LVS. If they cause you trouble, make sure to escalate this issue.
Potential to do all of this over the phone
There is a chance that for some locations that they’ll be able to help you through the phone. This is very rare case but it might be possible.
Following the example from one of our readers living in Prince George, they eventually called the Kelowna office and a CBSA officer was able to help through the phone. In this case:
- Initial call through the phone
- Documents sent to CBSA through e-mail
- Call back with the assessed charges where they then take your payment details
- When processed, they e-mail you scanned copies of everything (stamped) and ready to be forwarded to UPS.
We suspect that this CBSA officer was willing to help this reader out because they are located in a more remote location. For those on the west coast, Kelowna might be a good office to call as they might not be that busy.
What if I don’t have an existing contact? If you skipped right to Step 6 because UPS is giving you the run-around, you can try to submit your documents directly to UPS through an e-mail form that’s on a hidden page. You’ll need to have a UPS account. You can always try to get a contact through their contact page.
Step 6: Email Photo Of Receipt To UPS


With the stamped “Casual Good Accounting Document” (B15) and the UPS invoice (LVS) in hand, you can either take a photo with your phone or scan the document. This is the proof you need to provide to UPS that you’ve completed the self-clearing and that the taxes and duty have been paid.
In the e-mail from Step 3, there’ll be instructions for who to send this photo or scan to. In most cases, this’ll be the admin from the UPS port warehouse. If they happen to be working night shifts, they won’t be able to process your documents until they are back at work.
After this has been processed, you’ll receive an e-mail back with confirmation that the package is now released for shipping. Your tracking will be updated according and start moving from the port warehouse to your local warehouse.
Step 7: Package Is Delivered

The final step is like any other package UPS delivers except there won’t be any warnings of ludicrous import fees.
Your UPS tracking will be updated, your package will be delivered, and most importantly, you won’t owe them any money.
Is UPS Self-Clearance Worth It?
UPS brokerage fees are infuriating especially when you know they are the highest in the industry. Having learned how to avoid DHL custom fees, we applied the same learnings with our latest import fee surprise from UPS.
Something we often get asked is whether this process is worth it. In this personal case study, you’ll see how avoiding UPS brokerage fees can be very much worth your time.
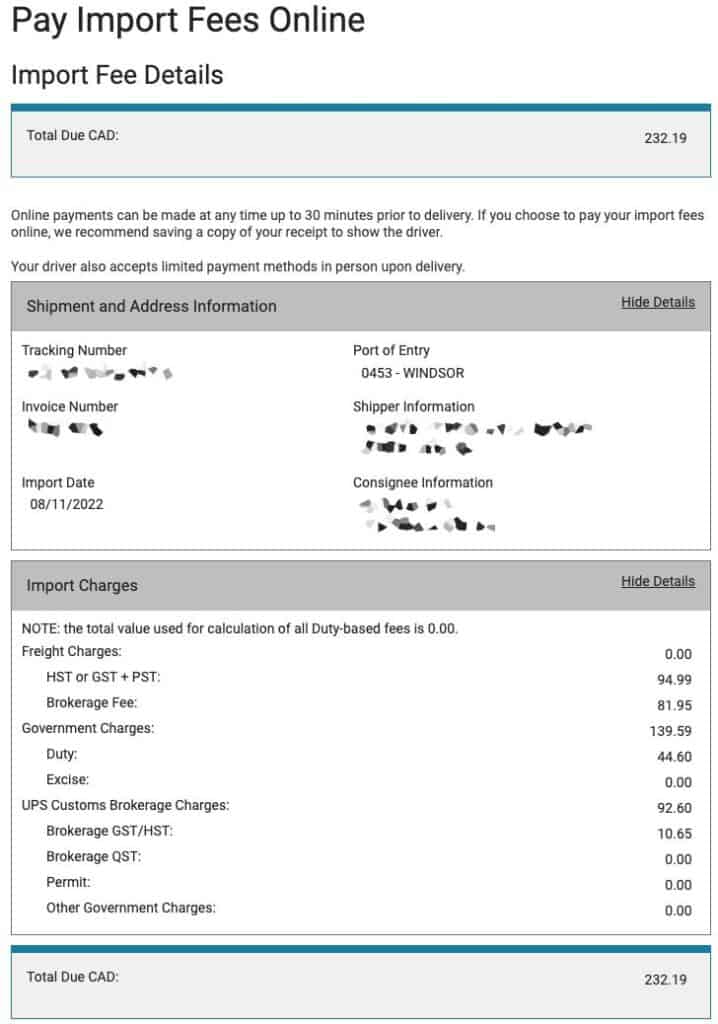
I purchased a Lord of the Rings collectible from Weta Workshop coming from the United States and you’ll see that UPS charged these additional fees: HST, Brokerage Fee, Duty, and taxes on fees.
Something that triggered some alarm bells was the fact they charged duty which didn’t make any sense since was coming from the United States.
UPS Import Fee Bill Total: £232.19 CAD
After going through the self-clearance process with CBSA, I paid significantly less.
CBSA Taxes and Duty Bill Total: £89.37 CAD
Total savings: £142.82 CAD
Not only did we save the ludicrous brokerage fee (disbursement fee embedded), but we also avoided the bogus duty charges that were accessed.
Worth it? Oh yes!
Frequently Asked Questions
This depends on the value declared on the package. At a minimum it’s £23.25 CAD + tax (brokerage + disbursement fee) but increases as the value increases.
There is unfortunately no substitute for going to an inland office in person. You cannot do self clearance of UPS packages online or over the phone.
In theory, UPS will not deliver a package with import fees unless they’ve been paid for ahead of time. That said, UPS has been known to deliver to your door and expect payment. Your best bet is to initiate the self clearance process as quickly as possible and while the package is still in transit.
If the delivery guy drops off the package at your door despite having import fees, expect to receive a bill in the mail. At this point, it is too late to self-clear the package because it is in your hands already.
Using the national post office of the originating company (i.e. USPS, Royal Mail) don’t charge a brokerage fee if taxes and duty are accessed.
They cannot hold your package indefinitely. UPS says that they will hold your package for 5 calendar days before warehouse storage fees kick in (£20.00 + £0.04 per lb. per day).
ICOD is an acronym for Import Collection on Delivery. This is a UPS fee that’s applied when the driver collects the import fee. Currently, it’s £6 CAD + tax that’s added to your import fee total.
Yes, you can refuse shipment. The package will then be returned back to sender.
You’ll be surprised to hear that you have up all the way until the first failed delivery attempt to let UPS know you’d like to self-clear the package.
If you signed up for a UPS My Choice account (free to sign up), you’ll receive an e-mail. Otherwise, shippers have to put a receiver phone number so if you don’t receive an e-mail, they will be calling you. Now you know why e-commerce sites always ask for your phone number.
Officially, UPS says you have 2 business days from the point that you receive the self-clearance documentation or else the package will be shipped back to the sender.
UPS Worldwide Express Plus, UPS Worldwide Express, UPS Worldwide Express Freight, UPS Worldwide Express Saver, and UPS Worldwide Expedited services.
If import fees (including brokerage fee) was assessed, you will receive a bill in the mail afterwards that you’ll be required to pay. UPS says that this should never occur but it has certainly happened to people.
Brokerage fees exist for Americans but only if the value of the duty exceeds £800 USD which is significantly more lenient than what it is for Canadians.
If you catch the package on its way in, the package will be held in the border port warehouse.
When you reject a package, it automatically goes back to the sender. At this point, you are no longer responsible for any fees so don’t pay for them even if an invoice arrives. If you do get an invoice, make sure to call UPS to make sure they cancel the bill.
Travel Resources For Your Next Trip
If you’re in the process of planning your trip and putting together your itinerary, these are genuinely the best resources that the Going Awesome Places team stands by 100%.
Credit cards: Don’t get burned by hidden fees on top of terrible exchange rates. When we travel now, we use the Wise Card. Simply load it with the currency you need before you go and use it as a regular VISA or their digital wallet card. Use their free app to track how much you have and top up when you need to.
Flights: Of all the booking search engines, Skyscanner is the most helpful and easy to use thanks to their Everywhere feature. Kayak is also another that’s we will often check as well.
Car Rental: If you’re looking to save money, these car rental coupon codes will be a true game-changer. Otherwise, DiscoverCars and RentalCars are great places to start.
Rideshare: For new Lyft users, use code WILLIAM4825 to get 50% off your first 2 rides (max £10 USD per ride). Offer valid for 14 days after you take your first ride. For new Uber users, use code psuqbjg4d7rn for the same offer except it’s valid for 30 days.
Airport Parking: You’ll need a spot to leave your car at the airport so why not book a spot at a discount. Use code AWESOME7 to get at least £5 off at Airport Parking Reservations or Park Sleep Fly packages.
Wifi Hotspot: We’ve been a huge fan of wifi hotspot devices such as PokeFi (use code GAP24300) because their rates are are hard to beat and it works globally. Solis is another that we recommend. Pros are that you can share the wifi with your whole group but cons are that you have to invest in a device and you have to charge it every night.
eSIM: Lately, we’ve really loved using eSIMs. We’ve tested several over the years and we have access to a few special promotions.
- Gigsky: Use TANG149 to get £3 USD when you sign up, then use code GOINGAWESOME to save 20% on all eSIM orders.
- KnowRoaming – Use code GAP10 to save 10%.
- AloSIM – Use code GOINGAWESOMEPLACES to save 15%.
- Airalo – Use referral code WILLIA9500 to get £3 USD credit on your first purchase.
- Ubigi – AWESOME10 to save 10% on your first order.
Hotels: Our go-to is Booking.com because they have the best inventory of properties including hotels and B&Bs plus they have their Genius tier discounts. Expedia is also worth using especially with their One Key rewards program which is basically like cash. The exception is Asia where Agoda always has the best prices. Always do a quick check on TripAdvisor as well.
Vacation Rentals: Your first instinct will be to check Airbnb but we always recommend checking VRBO as well if you’re looking for a vacation rental (now eligible for One Key).
Tours and Activities: When planning our trips, we always check both Viator and GetYourGuide to at least see what’s out there in the destination that we’re going to. They often have different offerings and prices so check both.
Travel Insurance: Learn how to buy the best travel insurance for you. This isn’t something you want to travel without.
- HeyMondo – Popular insurance provider for frequent travelers and comes with great coverage and special perks. By booking through our link to get a 5% discount!
- RATESDOTCA – Search engine Canadians looking for the cheapest insurance including multi-trip annual policies.
- SafetyWing – A perfect fit for long-term nomads.
- Medjet – Global air medical transportation.
- InsureMyTrip – Best for seniors, families, and those with pre-existing conditions.
If you need more help planning your trip, make sure to check out our Travel Toolbox where we highlight all of the gear, resources, and tools we use when traveling.
:max_bytes(150000):strip_icc()/TAL-parry-bay-zociac-chile-TIERRADELFUEGO0725-c5aadd06399e49c68b046e9ff5123f5a.jpg?w=175&resize=175,175&ssl=1 "This Explora Expedition to Tierra del Fuego Brings Travelers to the Southernmost Tip of South America")

:max_bytes(150000):strip_icc()/TAL-uzbekistan-train-attendant-and-train-TRAINUZBEKISTAN0725-af9a5f756fdb46c8870c4e483711ce62.jpg?w=175&resize=175,175&ssl=1 "See the Silk Road Gems Aboard Uzbekistan’s New Trains")